Tuesday, February 24, 2009

Top Hat Workshop

I will be conducting another hat making workshop at the de Young for their Friday Night event on March 13th. I did the same workshop last month and it was really fun. We used wallpaper sample sheets, buttons, ribbons and recycled produce netting. I got a lot of the supplies at SCRAP in San Francisco. Here are some images of my children in the top hat design.


The templates and instructions for this project are on my website.
http://www.okadadesign.com/workshop_4_top_hat.htm

Instructions and templates for the flower hat project I will also be teaching:
http://www.okadadesign.com/workshop_5_flowerhat.html

I hope to have a few more hat designs to post soon. Thinking about hats I was reminded of a paper bag hat assignment I created a few years back for elementary school students.

Below is my son in one of the sample hats I created for this project.


This project was inspired by Outside artist Moses. Images of his work are here:
http://www.flickr.com/photos/laurareilly/2897171477/

Other people inspired by his work:
http://amarettogirl.squarespace.com/blog/2008/6/22/the-potential-of-a-brown-paper-bag.html

Wednesday, February 11, 2009

Recycled Folders Book Arts

I have a bunch of workshops coming up in March: kites, book arts, mixed media corsages, mixed media hats and two Earth Day assemblies. So I am blogging a lot these days to keep my thoughts organized. I am starting to prep materials for the various projects. Tonight I snipped the points off of bamboo skewers for the kite project. I am also cutting folders for a book arts project. I designed a book project using cool international stamps that were given to me by Deborah Corsini, the Curator of the San Jose Museum of Quilts and Textiles. She also gave me the stamps my students used in The Peace Thoughts animation last year. We will also be using folders donated by Clif Bar. These folders were going to be recycled and I got a big box of them from my sister who works at Cilf Bar. Thank you Deborah and thank you Clif Bar!

The children will be given an enlarged image of a stamp and each child will be given a sheet with info about the country of origin and a small map of that country. The child will then choose snippets of information to include in the book and create a diorama on the Clif Bar folder. I think this will be a fun way to teach a little about geography and the history of stamps.
Below are a few of the stamps Deborah gave me.


I will post detailed info on this project on my workshop section of my website soon:
http://www.okadadesign.com/workshop.html

Below are images of the Clif Bar folders and the prototype I made. I just completed cutting the folders up (it took 1 hours and 30 minutes to cut 25 book forms with the windows). I'll be getting the ribbon at SCRAP in San Francisco on my next craft supply run. SCRAP is an awesome inexpensive resource for art materials. If you are in th
e Bay Area and do any kind of art, it is so worth checking out! http://www.scrap-sf.org/


Claymation Tips

I had a meeting this afternoon with the Director of Summer Camps at The Tech Museum in San Jose. She was so nice to meet with me and we shared some tips that we had each discovered regarding claymation. It was really interesting to learn a bit about their programs.
http://www.thetech.org/

I want to share a few of my simple claymation tips here.
1. Use plastic pearls with holes for eyes. You can color one hole black. This becomes the pupil which is really easy to move by just placing a pencil tip into it.
2. Place vaseline in the eye socket before you put the pearl bead in. Your bead eye will roll more smoothly.


3. Light your object from the side to pick up the texture and to create depth. (see above)


4. Dental floss (split into fine threads) works great for "flying" objects.
5. A few places to enter your animation into competitions:
Short Film Depot (international competitions): http://www.shortfilmdepot.com/pre_index.html
California Student Media Festival: http://www.mediafestival.org/
International Student Media Festival: http://www.ismf.net/ns/

Plastics and puppets!

I have started to research new materials for my animation classes. Although I love the colorful oil based clays I have been using in the kid's workshops, it sure is messy! The color gets on everything and the resulting clay figures and sets are not so permanent (easy to sit on and squash). So I have been researching an alternative for at least parts of the puppets and sets. I have found some info posted on a product called Friendly Plastic that sounds really cool and perfect for a classroom. It softens in warm water and then the child can mold it in sections over a wire frame work. It air hardens and can be painted. I will be researching armature wire next. Anyway here is where I purchased my Friendly Plastic. http://www.sunshinecrafts.com/body_friendly_plastic.html It was the cheapest I could find in my web searching. I can't wait for it to get shipped to me as I want to experiment with it and see if it really hold up well on the armature and if it takes paint well. I would be happy to have found a cleaner material that doesn't warp with handling.


I have also been talking with an animation instructor at San Jose State who is also a puppet maker, children book illustrator and musician (Renaissance Woman!). I hope to have her come as a guest speaker and talk with my students this summer. Her name is Raquel Coelho. Here is her site.
http://www.raquelcoelho.com/


Wonderful figure above created by Raquel Coelho.

Tuesday, February 10, 2009

Lights!

I stopped by Ikea the other day to get a storage unit for art supplies and of course ended up leaving with a lot of other stuff. I found awesome lighting options for my stop motion work! I was almost jumping up and down. I am sure I was talking out loud to myself when I was investigating these lights. Anyway, just had to blog about them. First, I found these flat lights that are meat to attach on cabinet shelves to light up glasses etc. I think they will be great to stick on the floor, walls and inside objects of the sets to create just the right lighting. They aren't too hot and we will be able to place colored gels over them to create differnent lighting effects. I like it that they are really flat and have long cords and don't emit a ton on heat. Perfect! These are called Dioder and cost $40.00 for a set of four. I'll post later on how they actually work in the sets.


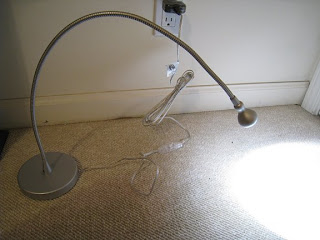
The second light (I bought two of these) is a long necked small lamp. I love it that the neck is really long and adjustable. The light can be a small spot light on our small set. Again, not too hot. We can place colored gels over it as well as black foil tent the light. This light is called Jansjo and cost $40.00 as well. I like both type of lights also because of their size and weight. If I am to bring these into schools and set up, these are very conveinent. Again, I'll have to really see how they work on our set, but I anticipate it will go well. All I need to get now is the big while foam sheet to angle at a 45 degree angle above the set to create the bounce light. I have a few other large lights on stands that we will also use.


I also got a small table at Ikea. $12.00. We will use this as the stage table. I got it because it is made of press board so it will be easy to drill into. It is super light so I wil have to devise a set up so that it is weighted not to move. But it is so cheap that I can drill and customize it without concern for messing it up. Again, if it works well, it will be great for my traveling animation workshop set up.

Inspiration for stop motion in paper arts

I have been brewing on the style direction for this summer's stop motion animation classes. I will let each child create his/her unique "thinking outside the box" sequence with a fold up box, clay and other mixed media materials. This will be part of either the opening or closing sequence. But the rest of the animation will be in a cut paper style that will fit well with the Pacific Northwest legend of the Crow and the Seagull. I found these two artists so inspirational for what I want to do with the children. First, I found this blog, Sakura Snow, really inspiring, especially this posting. What Suzanne has created is so suited to set design for stop motion (even the lighting) that I will adapt a lesson plan for the kids to make landscape sets that slide apart and together using this cut paper style. Please check out her site. Here is the posting I was inspired by and two images of Suzanne Norris's work below: http://sakurasnow.wordpress.com/2007/11/19/wintry-dioramas/
I am so grateful for all the amazing artists who post their work on the web. Inspiration at the touch of the keypad!


Images above and below courtesy of Sakura Snow.


The British artist, Su Blackwell, is the second mixed media paper artist who I was totally wowed by. She has done some animation work. Here is her site. Please check it out: http://www.sublackwell.co.uk/index.php

I have been dreaming about her work. Yep, it's that inspiring!
Below are two images of hers. I love the lighting in both and like the limited color palette. A limited color palette will work well with the Pacific Northwest imagery we will work with. I will be experimenting a lot with the kids this summer to really create mood lighting. I would love to have areas of the set fade into black to create depth and mood. More on lighting in my next blog entry.


Su Blackwell's art
above two images.

The final artist I would like to mention here in my inspiration blog is not a paper artist but a fantastic stop motion animator. Suzie Templeton created the Academy Award winning "Peter and The Wolf" animation. Here is her site: http://www.suzietempleton.com/pages/films/peter/watchclips2.html

She took a musical piece that has been depicted so many times in a very sugary way and created a dark, moody and moving animation that takes place in a depressed contemporary Russian setting.


Friday, February 6, 2009

Stop Motion Animation Classes 2009


I will be teaching stop motion animation to kids this summer in prep for classes I teach at public schools next year. The theme is "Thinking Outside The Box". Each child will be encouraged to explore his/her creativity as to the meaning of this phrase after hearing legends about magical boxes from three different cultures: Pandora's Box (Greek), Raven and Seagull (Nootka, British Colombia), and Anansi and The Box of Stories (West African).

I just started a fundraiser for the materials and tools I'll need on Fundable. Fundable is a great fundraising website and I got my digital LCD projector using them last year. The projector really has helped me teach more effectively in the classroom and cafeteria. Here is the link if you are curious and would like to pitch in.
http://www.fundable.com/groupactions/groupaction.2009-01-31.5516372540/groupaction_view

Here is the last kids animation I conducted last summer:
http://www.youtube.com/watch?v=xGAIQM9o-PY&feature=channel_page

Sunday, February 1, 2009

My One and Only Stop Motion Animation Gig

I have been going through my old CDs trying to cobble together old files for a design/illustration portfolio again and found this fun claymation job I did for an education CD ROM company (yep that dates me right there) called Tenth Planet. They were a great client out in Half Moon Bay and I remembered how fun it was to drive out to the coast on my visits. Most of my work was done remotely and usually I only visited my clients when I bid on the projects or when I was brought in with a team of other designer for game prototyping or something like that. This is the only claymation project I have done and there is a kind of funny story to go with it.


I was asked by the project director I worked with if I could do claymation. I said, "Sure! That would be fun!" I was totally clueless, but thought I could make up for it in enthusiasm. I made wire armature, but not with the appropriate armature wire. I cannot recall what clay I used. The end results were cute clay figures and a motorcycle for the bunny. I showed up at the shoot at the same moment as the camera guy and the light guy. It was kind of satisfying to see that they, too, drove mini vans. These guys were pros and had recently worked on Tim Burton's A Nightmare Before Christmas. After we got the lighting set and I started the first set of moves I heard the camera/editor guy stationed in the other room ask, "Has she ever done this before?" Big gulp. Guess enthusiasm didn't count for too much! Oh, and I think I used the wrong clay as it started to melt a bit and the weak waiter was a bit too weak...he would sag and lean. Man, I can laugh about it now! The nice thing was once it was established that I welcomed coaching, they were great teachers. (Guess they had no choice there!) In the end, the piece came out well for what it was. I learned on the spot not to make too big a move between frames and to also exaggerate a motion in the reverse direction before the action. ..but perhaps not much more than that. Anyway, I had a blast and was humbled by the experience. Ever since then I have hoped to do claymation again and really learn it. So, now I am educating myself as I teach and learn along side children. I do know a bit about storyboarding as I used to storyboard for various projects so I am incorporating these lessons in as well. Anyway, this was a fun blast from the past today to find this animation.