The animation is completed!
At a school with no computer lab we did something pretty fun and innovative on super low budget. We created this stop motion animation using a borrowed laptop, a $15 dollar mike, two still digital cameras, clay, two small stages and an assortment of freeware and donated software.
I just ran the voice files through another filter in my audio editing software (freeware called Audacity) to completely eliminate the humming. It turned out that I had the "gain" volume up all the way on my digital microphone when I recorded. I now know better. I thought this would make the volume of the speaker louder. Turning the gain up all the way actually makes the microphone pick up all the ambient noise around...fridge, air conditioner, rustling paper, etc. It takes a bit of digital acrobatics to eliminate the ambient noise and get the voices clear.
The children had gotten a taste of using the freeware Audacity in class when I recorded them and they tried some filters on their files to clean them up or make their recorded voices louder.
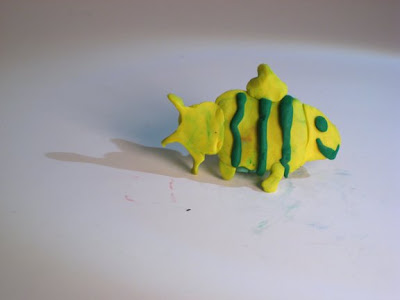
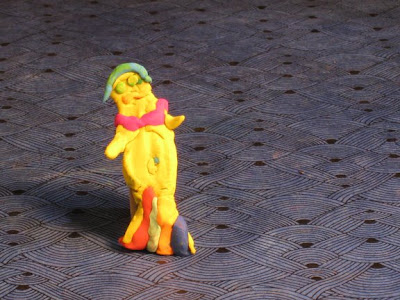
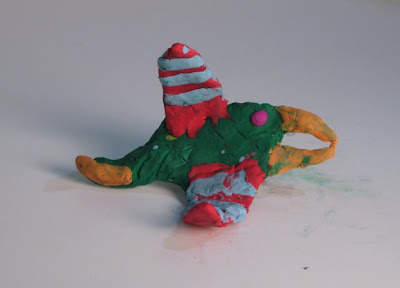
The children did a great job with this very involved animation project. I was very impressed that they challenged themselves to create two transformations for their cubes rather than the one transformation I had suggested. I hadn't planned on that and was happily surprised to see how well the two transformations worked out.
On Tuesday (if my family doesn't get hit by the flu I had last week) I will be going into Horace Cureton to give each child his/her DVD of the animation and to give them a hands on demo of the software I used. I will have a few students try out editing some of their clay images in Photoshop and a few will import into Premiere Elements. It would be great for them to have a taste of the software used. This workshop series was composed of 8 one and a half hour sessions in the classroom, plus the additional editing time in my studio. I can't believe it is done!
Sunday, May 31, 2009
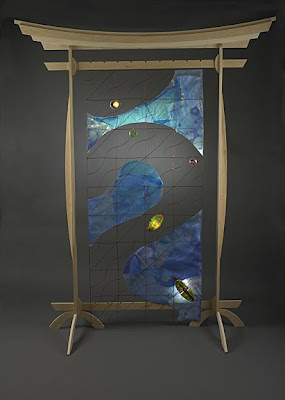
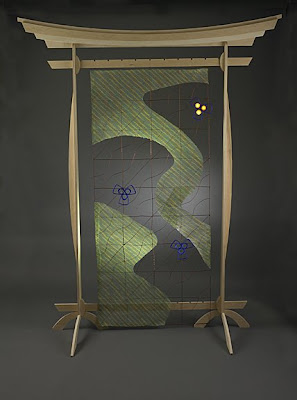
Final Water Banners
Today photographer George R. Young took photos of my Water Banners for the San Jose Museum of Quilts and Textiles. He did an artful job lighting each piece so that they really sang visually. George Young had been a friend of my family since he was stationed in Maui while he was in the military (he was a special diver on a nuclear sub). This was when my father was in college. George has been a photographer for many decades and has weathered the transition from film photography to digital photography with agility. He has been photographing my art since I started created little wire insects. Now he just shakes his head when I tell him I have three pieces that are 8ft tall. He had to scoot his camera stand to the very back of his studio in Palo Alto and the torri gate stand just barely fit into frame.
The elegant stands were created by Rob Bell. He made two for me. I'd love a third, but cannot afford it right now. These were a big investment for me, but well worth it as I can easily break down and set these up and use them for gallery shows, dance and in other settings. I just love them. I love it, too, that he used all scrap wood that had been laying about his studio for years to build these. Way to repurpose!
Detail image below:

Each banner will be decorated with diatoms made by visitors to the Sub Zero Festival on June 5th. The inspiration for the color and designs were ariel views of waterways as well as Japanese textile patterns. On the orange tapestry is a large hat that will be removed and worn by dancer Christina Braun during the festival. The hat was inspired by diatoms, and Japanese dance and rain hats. Each tapestry had light up led elements.
The banners will be later installed on the facade of the museum. The stands I will keep for future art shows and dance collaborations.
Orange banner below:


The elegant stands were created by Rob Bell. He made two for me. I'd love a third, but cannot afford it right now. These were a big investment for me, but well worth it as I can easily break down and set these up and use them for gallery shows, dance and in other settings. I just love them. I love it, too, that he used all scrap wood that had been laying about his studio for years to build these. Way to repurpose!

Detail image below:

Each banner will be decorated with diatoms made by visitors to the Sub Zero Festival on June 5th. The inspiration for the color and designs were ariel views of waterways as well as Japanese textile patterns. On the orange tapestry is a large hat that will be removed and worn by dancer Christina Braun during the festival. The hat was inspired by diatoms, and Japanese dance and rain hats. Each tapestry had light up led elements.
The banners will be later installed on the facade of the museum. The stands I will keep for future art shows and dance collaborations.
Orange banner below:


Friday, May 29, 2009
Horace Cureton Thinking Outside The Box Animation
We are slowly finalizing the Thinking Outside the Box animation. I hope to have it completed this weekend so that I can burn copies for each student. This morning I started the online application process for the International Student Media Festival. Below is the animation with voice and music. The music here is a test performance and I inserted it just to see how the pacing fits in. I though it might feel slow, but I think it is just right. I had to splice the music (in the dog to girl sequence) and know that I need to do it a bit better. Anyway, these guitarists are elementary and junior high school students who meet every Saturday at JSP Guitar and Sound Studio in Sunnyvale.
Horace Cureton will be showing it to their student on the 11th. I think they did a great job.
Horace Cureton will be showing it to their student on the 11th. I think they did a great job.
Water Tapestry Banners Update
Here are two of the completed banners tied down on cardboard. I will be adding a few LED lights to each. All three banners will photographed professional on Sunday by George R. Young. Today I picked up the stands from Rob Bell in San Francisco.


Tuesday, May 26, 2009
Claymation Day Seven
Today we recorded the final voices. Some children were quite shy speaking into the microphone and I can understand why as this is not a natural or familiar thing to do. There are only two audio files I need to really work with more. I hope to insert those tomorrow. They did a great job with all these new experiences and challenges. Each child spoke a sentence or two about what thinking outside the box means. The average length was five seconds of audio per child. This fit pretty well with their animations. I used the freeware, Audacity, for the sound recording and editing.
Next week on June 2nd I'll be going back to show the children their movie. This weekend I'll be burning 31 or so DVD's for the students (29 students, teacher and The Alum Rock Education Foundation). I'll also be burning DVD's for the student guitar ensemble that will be providing the music track.
Here is the animation so far. The music will be the next element added:
Monday, May 25, 2009
Butoh Dance Costume continued
I have been working periodically on the water tapestry light up hat for the Sub Zero Festival. I just completed the third large tapestry and can now focus on this hat and all the visitor participatory elements for the event.

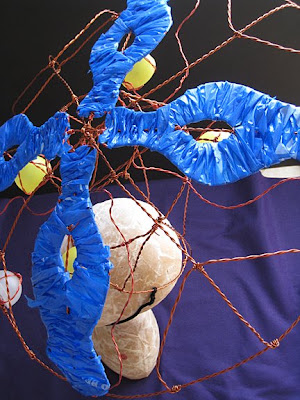
Here is the hat with some of the woven plastic bags on it. There will a bit more over the triangular sections. I have placed a light to shine on the dancers face. The hat has also been tilted and elevated so that Christina's face will be more visible as the expressions of the face are very important in butoh. I hope to get this hat to her early this week so she can practice with it. The elevating structure removes so if it is too cumbersom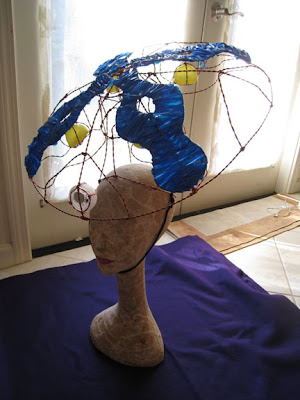
 e, I will remove it. There will be several large sashes to anchor the hat. around the chin.


Here is the hat with some of the woven plastic bags on it. There will a bit more over the triangular sections. I have placed a light to shine on the dancers face. The hat has also been tilted and elevated so that Christina's face will be more visible as the expressions of the face are very important in butoh. I hope to get this hat to her early this week so she can practice with it. The elevating structure removes so if it is too cumbersom

 e, I will remove it. There will be several large sashes to anchor the hat. around the chin.
AAWAA 20th Year Celebration..Planning and Conceptualizing
I am a member of an artist group called AAWAA.
It is an Asian American Women Artists group here in the San Francisco Bay Area founded twenty years ago by Flo Oy Wong and Betty Kano and includes musicians, writers and visual artists.
We are in the planning stages of what we will do for this 20 year celebration and have rented SOMA ARTS for an evening celebration on September 26th and a two week period surrounding that date.
Only in the past year has AAWAA become an official 501c nonprofit and notably last year AAWAA had an artist residency at the de Young Museum in San Francisco titled “A Place of Her Own”. This exhibit was conceptualized by Cynthia Tom.
AAWAA also published a book called “Cheers to Muses” and members have participated in presenting lectures at nearby universities and colleges.
In celebrating this 20 milestone, we need to look both backward and forward and build upon what the organization has already done. Two of the exhibits at the 20 year anniversary will focus upon expanding on Cheers to Muses and A Place of Her Own concepts. There will also be a display of the history of the organization and works of current and past members. Sue Kwon of Channel 5 News has graciously agreed to join us for the evening in some sort of presenter function.
I am participating in brainstorming and conceptualizing how to expand the Place of Her Own concept out to become a public participatory project. I would love for the actual “box” that the individual personalizes to be something that is downloadable... a template that can be printed and folded up into a box. I would also like to see the AAWAA website post images of these individual creations ...people would photograph their box and email the image back creating a sort of online virtual tapestry of little spaces knit together. For the purposes of the 20th anniversary perhaps we would have an earlier workshop using pre assembled boxes to work with and then at the event have a table were people could create their spaces and add them to the growing tapestry.

Above: Rough concept sketch of fold up boxes that individuals would personalize. These shapes would then be connected to form a hanging installation to be hung in SOMA ARTS. The outside of the box would be decorated with images representing how we present ourselves to others and the inside would be decorated with images and objects that represent one's interior creative self and space.
CONCEPT FOR VISITOR PARTICIPATORY PROJECT
Having space or place of one's own as an artist does not mean just a physical space. As an artist it is most important to create a space for quite creativity in one’s mind. We all need people in our lives who help us create that mental space. It seems cliché, but it does take a village, whether it is someone willing to listen, babysit, critique a painting or read our writings … we need the nurturing of others to help us define ourselves as artists and create that mental space to be one. So often we do not get that support. It is also important that we freely offer that support to others as well.
As a female artist and caretaker with other responsibilities, I know I speak for a lot of women artists when I say that my art world is cobbled together from different contacts and experiences and these all thread together at disjointed times…an email here and an email there. We do not live and breathe being an artist all day; it is a fractured existence of disjointed moments between other roles. My blog is my space of my own where I have my voice and can articulate ideas in an organize way. My time in my studio at night is my space of my own to create my art.
My physical art space used to be a large sheet of cardboard from a refrigerator box that I would lay flat across my bed for a work space. At night I would tie down my art with wire and prop it against the wall so my husband and I could sleep in the bed. It didn’t bother me that this was an unusual set up. I was compelled to create my work and this was my solution to create a large work area. The key was that I had the mental space to view myself as an artist and not as a crazy woman with cardboard on her bed.
I have an artist friend, Nemo Gould, who, when I met him, had created a huge mechanical squid the length of a car. I thought, man, this guy must have the hugest coolest studio. Nope, he built it in the narrow hallway of his apartment! He had understanding roommates. It takes imagination not only to create art, but to create that mental space to envision you available physical space as usable and to make it your studio. (By the way this was years ago and I think Nemo now has that huge cool studio).
We need the support of others to create our own space. It may seem ironic, but we need others to help us find that private isolated mental space to explore who we are as artists.
Reflecting this interlocked nature, I envision that the AAWAA visitor participatory tapestry would be composed of interlocking containers folded up from a PDF template printed on cardstock. The PDF could possibly have information printed on it somewhere about mental breathing space. It could have mental health info on it as well. This mental health issue was brought up in some of the discussions and perhaps can be intergrated. Cynthia Tom also envisioned an outreach component to social services and women's shelter to develop an art workshop that is designed to help women express themselves and think about what they need to create that place of her own. I envision that the completed tapestry would have some empty spaces or blackened boxes representing space yet to be discovered.
At any rate this above is a first pass at the concept.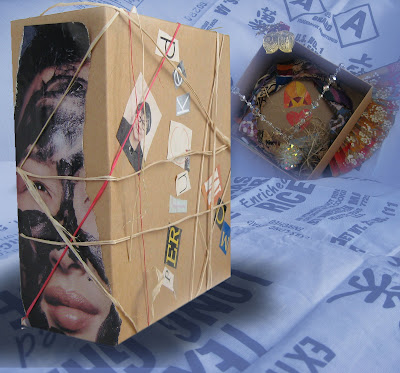
Shizue Seigel sent this image to me of a piece she had created in another workshop.
"On a related theme, at a workshop we were given a box with a lid and asked to decorate the outside as others expected us to be, the inside as our inner selves. They were commercially produced carboard boxes. Instead of lid and box, each of the two pieces could be separate units with the outside on one side, walk round to see the inside, strung with fishing line." I can visualize elements of this used for the Place of Her Own visitor participatory project.
It is an Asian American Women Artists group here in the San Francisco Bay Area founded twenty years ago by Flo Oy Wong and Betty Kano and includes musicians, writers and visual artists.
We are in the planning stages of what we will do for this 20 year celebration and have rented SOMA ARTS for an evening celebration on September 26th and a two week period surrounding that date.
Only in the past year has AAWAA become an official 501c nonprofit and notably last year AAWAA had an artist residency at the de Young Museum in San Francisco titled “A Place of Her Own”. This exhibit was conceptualized by Cynthia Tom.
AAWAA also published a book called “Cheers to Muses” and members have participated in presenting lectures at nearby universities and colleges.
In celebrating this 20 milestone, we need to look both backward and forward and build upon what the organization has already done. Two of the exhibits at the 20 year anniversary will focus upon expanding on Cheers to Muses and A Place of Her Own concepts. There will also be a display of the history of the organization and works of current and past members. Sue Kwon of Channel 5 News has graciously agreed to join us for the evening in some sort of presenter function.
I am participating in brainstorming and conceptualizing how to expand the Place of Her Own concept out to become a public participatory project. I would love for the actual “box” that the individual personalizes to be something that is downloadable... a template that can be printed and folded up into a box. I would also like to see the AAWAA website post images of these individual creations ...people would photograph their box and email the image back creating a sort of online virtual tapestry of little spaces knit together. For the purposes of the 20th anniversary perhaps we would have an earlier workshop using pre assembled boxes to work with and then at the event have a table were people could create their spaces and add them to the growing tapestry.

Above: Rough concept sketch of fold up boxes that individuals would personalize. These shapes would then be connected to form a hanging installation to be hung in SOMA ARTS. The outside of the box would be decorated with images representing how we present ourselves to others and the inside would be decorated with images and objects that represent one's interior creative self and space.
CONCEPT FOR VISITOR PARTICIPATORY PROJECT
Having space or place of one's own as an artist does not mean just a physical space. As an artist it is most important to create a space for quite creativity in one’s mind. We all need people in our lives who help us create that mental space. It seems cliché, but it does take a village, whether it is someone willing to listen, babysit, critique a painting or read our writings … we need the nurturing of others to help us define ourselves as artists and create that mental space to be one. So often we do not get that support. It is also important that we freely offer that support to others as well.
As a female artist and caretaker with other responsibilities, I know I speak for a lot of women artists when I say that my art world is cobbled together from different contacts and experiences and these all thread together at disjointed times…an email here and an email there. We do not live and breathe being an artist all day; it is a fractured existence of disjointed moments between other roles. My blog is my space of my own where I have my voice and can articulate ideas in an organize way. My time in my studio at night is my space of my own to create my art.
My physical art space used to be a large sheet of cardboard from a refrigerator box that I would lay flat across my bed for a work space. At night I would tie down my art with wire and prop it against the wall so my husband and I could sleep in the bed. It didn’t bother me that this was an unusual set up. I was compelled to create my work and this was my solution to create a large work area. The key was that I had the mental space to view myself as an artist and not as a crazy woman with cardboard on her bed.
I have an artist friend, Nemo Gould, who, when I met him, had created a huge mechanical squid the length of a car. I thought, man, this guy must have the hugest coolest studio. Nope, he built it in the narrow hallway of his apartment! He had understanding roommates. It takes imagination not only to create art, but to create that mental space to envision you available physical space as usable and to make it your studio. (By the way this was years ago and I think Nemo now has that huge cool studio).
We need the support of others to create our own space. It may seem ironic, but we need others to help us find that private isolated mental space to explore who we are as artists.
Reflecting this interlocked nature, I envision that the AAWAA visitor participatory tapestry would be composed of interlocking containers folded up from a PDF template printed on cardstock. The PDF could possibly have information printed on it somewhere about mental breathing space. It could have mental health info on it as well. This mental health issue was brought up in some of the discussions and perhaps can be intergrated. Cynthia Tom also envisioned an outreach component to social services and women's shelter to develop an art workshop that is designed to help women express themselves and think about what they need to create that place of her own. I envision that the completed tapestry would have some empty spaces or blackened boxes representing space yet to be discovered.
At any rate this above is a first pass at the concept.

Shizue Seigel sent this image to me of a piece she had created in another workshop.
"On a related theme, at a workshop we were given a box with a lid and asked to decorate the outside as others expected us to be, the inside as our inner selves. They were commercially produced carboard boxes. Instead of lid and box, each of the two pieces could be separate units with the outside on one side, walk round to see the inside, strung with fishing line." I can visualize elements of this used for the Place of Her Own visitor participatory project.
Saturday, May 23, 2009
Claymation Day Six, breather sequences and sound
Yesterday was the sixth day of the animation workshop at Horace Cureton Elementary. The children filmed three breather sequences which I inserted in between sections of their animation. They did a fantastic job! It was nice to see them use a concept from the Sony Bravia Bunnies video as I think actually trying these cube movements gave them a better understanding of how time consuming and precise that particular stop motion animation was
This animation workshop series is the first time these 29 4th/5th grade students have created a stop motion animation. We have not completed the animation yet, but the results so far are beyond what I had expected. There is a combination of planned organization and free form creativity that is required of each child. I like conducting these animation workshops as they require each child to exercise a blend of different skill sets. Most importantly, it is a project that is impossible without teamwork.


TEST ANIMATION WITHOUT SOUND:
Above is the animation so far with all the stop motion parts inserted. It needs to be tweaking it a bit. The pacing will be adjusted (credit screens will linger longer). I also need to add a few credit screens to give credit to the Alum Rock Education Foundation for the mini grant, the egg company for the egg carts and a few other people who have made making this animation workshop possible. I also want to add a few process screens at the end showing the kids at work making the animation. These kind of images at the end of animations are always fun...kind of a peek behind the magic.
What remains is the voice recording and the music. I hope I can get this completed in the next week. I estimate that the final run time will be five minutes as I will need to lengthen each animation sequence to match the voice for each child. I also might break up the animation sequences a bit more. I placed the third breather at the very end, but I think I need to divide up the animations a bit more. I'll be experimenting with that.
VOICE RECORDING
We also started recording their voices yesterday. This was an interesting challenge as the air conditioner would turn on and off frequently and was very, very loud. Also, an elementary classroom is no sound stage...you just cannot expect kids to be totally silent as they needed to be working on other assignments as I recorded their voices one by one.
I hope the ambient noise will filter out OK. I borrowed a pop filter from a friend and that will hopefully help at least with the voices a bit.
MUSIC
A guitar ensemble group of elementary and junior high school students will be recording the music...an original composition titled "Marching Ants." More on that in another posting.
Got up at 5:00am to complete this animation build here.. Kind of can't see it clearly anymore and need to work on other projects now.
Tuesday, May 19, 2009
Claymation Day Five
Yesterday we filmed the last of the children's animation sequences. Here are some still images from the sequences from yesterday. I will be editing out the post behind the flower in this animation sequence below. The post was used in a few other sequences where it will have to be removed.


We had a second stage set up again. This was very helpful. We used two thick sheets of foam core boards. A light from Ikea and a borrowed light from De Anza College's Euphrat Museum's Arts in The Schools Program. Second camera and camera stand also borrow, although I have order a second camera of my own that should be here by Friday.

SOUND RECORDING
We will begin sound recording on Friday. I was supposed to go in today but my son has a headache and is feeling sick so this recording will be done on Friday.
BREATHER SEQUENCES
We will be using colored cubes of different colored sides to create the breather sequences. The cubes will move across the stage and turn on their sides. I hope to film three of these sequences to break up the animation into sections. Two sequences would be fine, too. The children will have fun with this as instead of one animator there will be 9 or ten kids moving cubes around the stage at any one time. It will be f un and crazy.
Part of the first stage folded up and ready to take back to my studio. This also can double as a shadow puppet stage. For this set up we draped a black cloth over the back and had a patterned floor for the stage. The blue painters tape was useful to hold a lot of things in place: cables, camera tripods, lights, stage parts...etc.


We had a second stage set up again. This was very helpful. We used two thick sheets of foam core boards. A light from Ikea and a borrowed light from De Anza College's Euphrat Museum's Arts in The Schools Program. Second camera and camera stand also borrow, although I have order a second camera of my own that should be here by Friday.

SOUND RECORDING
We will begin sound recording on Friday. I was supposed to go in today but my son has a headache and is feeling sick so this recording will be done on Friday.
BREATHER SEQUENCES
We will be using colored cubes of different colored sides to create the breather sequences. The cubes will move across the stage and turn on their sides. I hope to film three of these sequences to break up the animation into sections. Two sequences would be fine, too. The children will have fun with this as instead of one animator there will be 9 or ten kids moving cubes around the stage at any one time. It will be f
 un and crazy.
Part of the first stage folded up and ready to take back to my studio. This also can double as a shadow puppet stage. For this set up we draped a black cloth over the back and had a patterned floor for the stage. The blue painters tape was useful to hold a lot of things in place: cables, camera tripods, lights, stage parts...etc.
Monday, May 18, 2009
Third Water Tapestry for San Jose Museum of Quilts and Textiles
I have completed the wire form base for the third water tapestry.

Detail

Interesting nylon fabric donated by Walker Bags of San Francisco.
The first two wire form banners stacked together hanging on a stand. The visitor created diatoms will attach and complete these banners. I will also be creating a large diatom element for each as the focal point. Several diatoms will illuminate on each banner with led lights.


Detail

Interesting nylon fabric donated by Walker Bags of San Francisco.

The first two wire form banners stacked together hanging on a stand. The visitor created diatoms will attach and complete these banners. I will also be creating a large diatom element for each as the focal point. Several diatoms will illuminate on each banner with led lights.

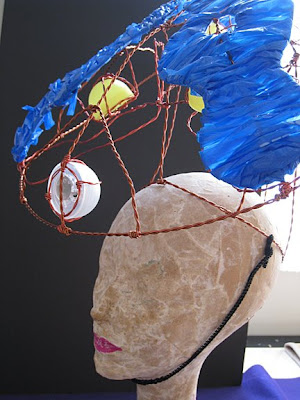
Butoh Dance Costume


I am working on the third tapestry for the San Jose Museum of Quilts and Textiles and in the process am also working on a large diatom element that will remove from the tapestry and be worn as a hat by dancer, Christina Braun. Above are images of the wire form in process of being built.

Above is the hat form being built on a trash can lid. Below: Preliminary sketch. I had originally thought of doing a sort of floral diatom shaped hat, but it looked, well, too floral. After looking at a lot of diatoms, I decided to make it round and base it on a Japanese rain hat. Instead of one diatom design on the hat, I have arranged various diatom shapes in a radial format around the hat form. I will be placing led lights behind the forms. I will be weaving plastic bags to create the solid diat
 om areas.
Sunday, May 17, 2009
Claymation Day Four
Here are 19 of the 29 animation sequences. I will be filming a few more at lunchtime tomorrow at Horace Cureton Elementary then again on Tuesday. Luckily I was able to borrow a second digital camera and camera stand from my friend, Melanie Woodard. She has been so generous with supplies for so many of my workshops. I have purchased a second camera, but it will take a while to ship so this worked out well. I also have been lucky to have great lights lent to me from De Anza College's Euphrat Museum's Arts In The Schools Program. I purchased various lights from Ikea in addition to the two lent from De Anza and the set up seems to be working fine. I have had to adjust the levels just a bit in Photoshop on a few animation sequences and I erased out fingers and blocks of clay in a few to make it appear that objects float. Some day it would be nice to have a longer workshop series at the school and lots of computers to show the kids how to do this image editing themselves.
BREATHER SEQUENCES
I am having the students brainstorm on breather sequences, or sequences to break up the monotony of the continuous box morphing. I am hoping to film two of these sequences on Tuesday.
SOUND RECORDING
I also hope to start the sound recording on Tuesday. This I will have to refine a bit as I need to have very short phrases or statements from each child to go with each animation and as you can see, the animations flash by fast. I think I will have to have lengthen the time lingered on one of their object morphs to get the animation to match the voice length.
INTERNATIONAL ANIMATION FESTIVAL
I am hoping that we can enter the completed animation into the International Student Media Festival. It would be really wonderful for these student to feel a part of a larger creative community. I have asked the festival for a deadline extension, so we will see if we can enter. The deadline is May 30th and we need a bit more time to complete it and ship out the DVD. I would really love for the kids to be aware of these festivals and check out other student created movies and animations from other parts of the United States and from around the world. The exciting thing is if their movie gets selected as a finalist, it will be screened at the festival.
I noticed that this above uploaded animation in Flash is kind of blurry and that my previous Windows Media player ones were clearer, but some people were having problems viewing the Windows Media Player so I am hoping that the Flash above is more universally viewable.
Saturday, May 16, 2009
Refining the Visitor Activity of The Quilt Museum's Sub Zero Project
I have spent a few hours refining what will be the visitor component of the San Jose Museum of Quilt and Textile project for the Sub Zero Festival on June 5th.
The visitors will have a choice of creating diatoms from plastic bottle bottoms or weaving a diatom from plastic bag yarn.
I have chosen the imagery of diatoms because these bloom in our creeks when they are clogged with plastic bags, bottles and all the other garbage that have led our Guadalupe River and Coyote Creek to be declared "Impaired".
I have already prepped all the plastic bottles collected from the Rotary Club clean up at Guadalupe river and collected from a Walk-a-Thon from Stevens Creek Elementary. All that remains is to hole punch these so that they can be tied down to the banners after the visitor has decorated them.
The plastic bags are being collected at Lynnbrook High School in Cupertino and at Horace Cureton in Alum Rock.
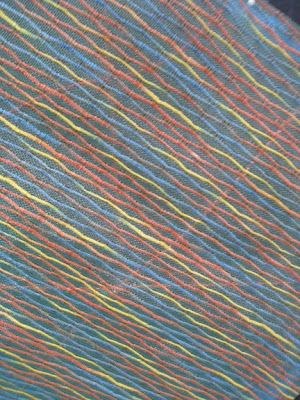
Below: Plastic bottle diatom samples.These are created by cutting off the bottoms of plastic bottles and then decorating them with permanent magic markers.

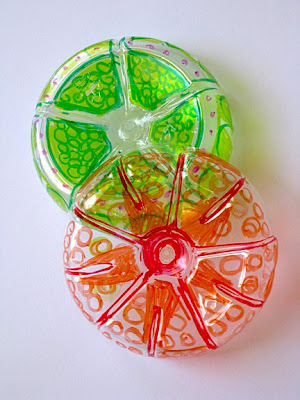
Below: Diatoms woven samples. Made from pipe cleaners, floral wire and plastic bag yarn and produce netting.

The visitors will have a choice of creating diatoms from plastic bottle bottoms or weaving a diatom from plastic bag yarn.
I have chosen the imagery of diatoms because these bloom in our creeks when they are clogged with plastic bags, bottles and all the other garbage that have led our Guadalupe River and Coyote Creek to be declared "Impaired".
I have already prepped all the plastic bottles collected from the Rotary Club clean up at Guadalupe river and collected from a Walk-a-Thon from Stevens Creek Elementary. All that remains is to hole punch these so that they can be tied down to the banners after the visitor has decorated them.
The plastic bags are being collected at Lynnbrook High School in Cupertino and at Horace Cureton in Alum Rock.
Below: Plastic bottle diatom samples.These are created by cutting off the bottoms of plastic bottles and then decorating them with permanent magic markers.


Below: Diatoms woven samples. Made from pipe cleaners, floral wire and plastic bag yarn and produce netting.

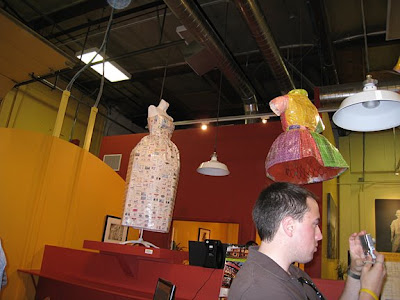
Art Opening at Bill Gould Art and Architecture
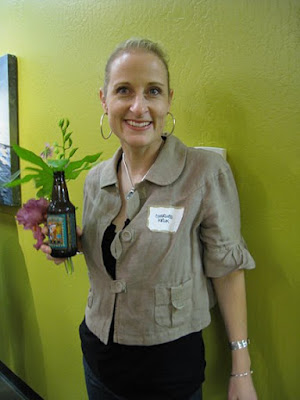
My friend Charlotte Kruk was part of a group show art opening at Bill Gould Art and Architecture on Thursday night and it was really a blast. Wonderful music and food (well, I got there too late for the food) and all the art was really interesting. The works will be up for six months.
Below: Charlotte's wearable art made of food wrappers
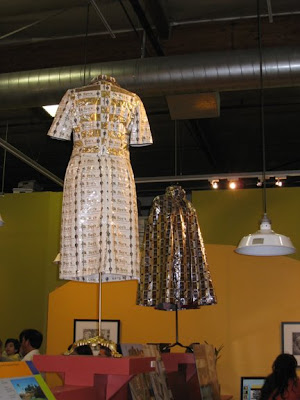
Below: Several of Charlotte's dresses dramatically hung. I have never seen them hung this way and really liked seeing them floating like this.


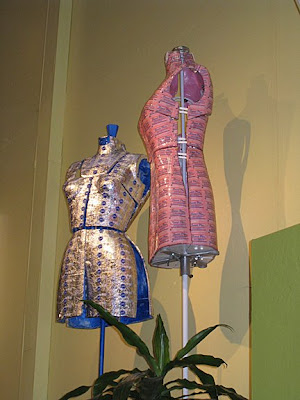
A few of Charlotte's dress form sculptures.
Below: Charlotte at the opening and Charlotte with photographer friend, David.

Some works in progress on display on in the shop area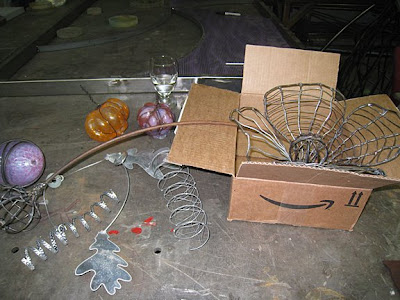 of B
of B ill Gould Studio

Below: Charlotte's wearable art made of food wrappers

Below: Several of Charlotte's dresses dramatically hung. I have never seen them hung this way and really liked seeing them floating like this.


A few of Charlotte's dress form sculptures.


Below: Charlotte at the opening and Charlotte with photographer friend, David.


Some works in progress on display on in the shop area
 of B
of B ill Gould Studio

Subscribe to:
Posts (Atom)

