Sunday, May 27, 2012

Seeking Shelter Installation/ More Model studies

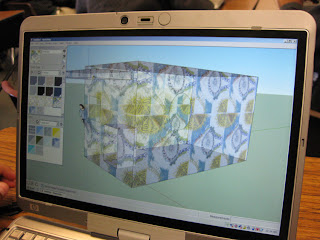
David Okada has been busy making another rough model study of my concept for a public participatory bus shelter installation that will be a part of the 2012 ZERO1 Biennial in September. He surprised me by sticking in scale figures that are my mom, sister and my children! The roof here does not reflect the shape or materials of the actual installation. The roof will be more dynamic that what is seen here.(see earlier blog postings) The final roof is made of pvc tubes and will be covered by floating polygal shapes sandwiched between mesh.
The stickers in this model (he used translucent Zip-A-Tone...remember that medium!) represent vinyl window decals that the public will stick to the polygal walls. I will be taking youth pattern reflections on local community and will be translating them into vector files (Illustrator) so that I can laser cut colored vinyl film, hopefully at the TechShop, to create the decals.

How will people interact with this installation?
  1. They will add vinyl decals (of various sizes and colors) to the walls to create a colorful collaborative collage. At night the shelter will light up like stained glass. (day and evening activity) This idea is inspired by the Obliteration Room by Yayoi Kusama.
  2. Using a wii remote interactive surface set up, the public will explore creating a large mural of patterns created from local photos. This will be on one wall of the shelter. (evening activity)
  3. Using Makedo connectors, the public will add components of polygal and cardboard to grow the space and to add their ideas of what other features it could have. (day and evening activity) We will be adding pre-drilled holes to the polygal to facilitate the connection of Makedo parts.
Table activity of small scale model making:
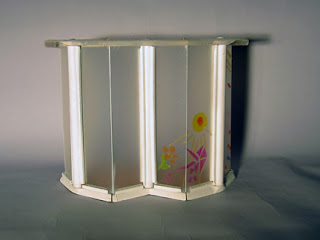
At the 2012 ZERO1 Biennial, there will also be tables set up at which the public can create small scale models of innovative bus shelters they envision. I just posted info in this lesson plan at Instructables. 5th graders I taught this school year will be assisting in teaching this workshop at the festival. We will have a diorama in which to photograph the festival creations and upload them to a flickr set for sharing with the schools participating in the Seeking Shelter Design Challenge.
Monday, May 21, 2012

Seeking Shelter Installation Roof Design

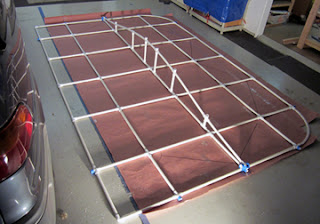
Top view of roof
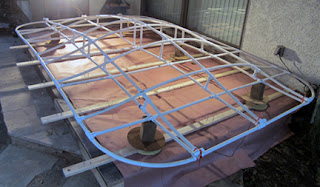
Underside view of roof
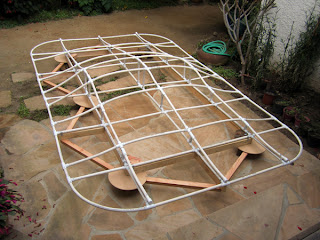
My dad, toy designer David Okada, has been busy working on creating the roof framework for the Seeking Shelter installation that will be a part of the 2012 ZERO1 Biennial. He heat bent pvc tubes to create the arch drawn in our sketches. The wooden discs will anchor the roof to the pillar supports. The thin wooden strips are channels for the polygal walls to slip into.

As a former VP of Boys Toys at Mattel and as a former Director of Inventor Relations at Mattel Toys, my dad has a deep knowledge of materials and construction techniques for both prototyping and for final design constructions. I am very lucky to have him working on this project!

We will be painting both the wood and pvc tubes. I will be sourcing the sonotube support pillars and polygal wall materials in the next few days. In the coming weeks we will be considering how we will possibly integrate Makedo elements into the pieces so that festival attendees can add their building ideas to this bus shelter. I also will have a wii interactive surface setup on one of the bus shelter walls so that people can create dynamic mural patterns on the walls using Repper and photos youth have taken of Silicon Valley.

At tables nearby, we will have model building workshops where people can create prototypes of multipurpose bus shelters, photograph them in a diorama and then upload the images to a flickr site to share as inspiration images for the Seeking Shelter Design Challenge.
Sunday, May 20, 2012

Wrap It Up! Youth video interviews with mural artists

Mural design using archeological artifacts (cow bones for soups and porcelain bowl fragments). Artifacts are from dig site from within the fence area.
QR codes on mural wrap will link to videos hosted on Next Vista for Learning.
A youth video project will launch in the fall that will engage San Jose Japantown youth in interviewing 30 or so local mural artists. The collaborative mural will be a digital fence wrap on the fence bounding Jackson, 6th, Taylor and 7th Street. On the project site, http://wrapitupmurals.weebly.com/ , I am slowly building out the project and lesson plans.

Google SketchUp/Seeking Shelter

 
 In the last few weeks I have been conducting Google SketchUp workshops with 5th graders at two schools, one in Cupertino and the other in San Jose, California. I am working with 132 students. Students are learning how to create solid geometry forms from plane geometry shapes and are thinking about creating a 3D space that people move through. They will be creating their vision of bus shelters. On the surfaces of their structures they are applying their pattern designs reflecting on community.
 What I learn in teaching these workshops has led to revisions in lesson plans on the Slot Shelters site in the Google SketchUp workshop section. I have been fortunate to bring in HP tablets loaded with SketchUp in to the classrooms. The Krause Center for Innovation has been very generous to loan me these computer for these workshops. In the coming weeks student designs will be uploaded to the SketchUp 3D warehouse.


Friday, May 18, 2012

Maker Faire Educator MeetUp

Yesterday I attended the Maker Faire Educator MeetUp at the San Mateo Fairgrounds. I was only able to attend one hour as I had two school open houses to attend, but, wow, what a great preview! It was very inspiring.

Marc de Vinck, Director of Product Development for Makezine, invites educators to experiment with LED lights and batteries.
The first station I came upon was this visually inviting one with colorful LED lights and batteries. This is a great hands on lead-in exploration to introduce youth to electrical circuitry. It is also inexpensive. Marc de Vinck told me that best way to source the LED lights is by searching for bulk LED lights is on eBay (about 1.80 for pack of 15 lights). The lithium batteries are from IKEA and a pack of 8 is $2.00. A roll of duct tape from Home Depot is around $4.00. So for about $17.00 (including shipping costs) you can conduct this really memorable and fun exercise in a classroom of 33. There are cool collaborative public art projects using these components. I saw this video quite a few years ago, but it is stuck in my head: http://www.graffitiresearchlab.com/blg/projects/led-throwies/
I would love to do a project that integrates these LED throwies (the most expensive components are the rare-earth magnets...the cheapest that would work are around .15 cents each)

The other booth/station I spent a lot of time at was hosted by BrainSpaces in partnership with the Chicago Architecture Foundation. Their Maker Faire project invites youth to envision a better school locker. Their project site is elegant and so very well structured to walk one through the design process. It was incredibly inspiring to chat with Kelly Tanner of Brain Spaces and I wish I had know about this project earlier. It overlaps a lot with what I am doing in the Slot Shelters project and the Seeking Shelter Design Challenge.

You can see in the image below how engrossed educators were in exploring Google SketchUp to create their lockers.


As I walked to my car I took a picture of a public art project that will be installed during the Maker Faire. To me this dandelion sculpture (I think it lights up at night) really symbolizes the Educator MeetUp; teachers will return to their classrooms with seeds of inspiration for projects to engage their students with in the coming academic year. We have the summer to stew upon ideas. Can't wait to see what grows from these seeds of thoughts planted.


Tuesday, May 15, 2012

Interactive Bus Shelter Installation

I have been fortunate to have my dad, a toy designer and great creative mind, working on the Seeking Shelter art installation for the 2012 ZERO1 Biennial. Working from my conceptual sketch, he has designed a great roof framework made from PVC tubes and connectors. The walls of the shelter will be polygal upon which the public will add removable window decals designed by local youth.The pillars of the shelter will be cardboard concrete pour tubes. I am also hoping to integrate the use of Makedo  connectors and cardboard into the installation and related table activities at the ZERO1 Biennial event days in September. I am still dreaming of having a few of Monkey Wrench Design's tin can phones in this installation. (see the cans sitting on the yellow disk tables in sketch below). 12 more days to fund their project on Kickstarter!
My original bus station concept and rendering. The
zig-zag vertical walls are four 4' x8' x 1/4" corrugated plastic
translucent panels, polygal.
First scale model by David Okada. 1" = 1,' made of 5/8" wood dowels
and wire.Dowels are nailed and glued to the 'blueprint.'
Zig-zag panels are thick clear acetate sheet.
Initial laying out of full-sized PVC pipe roof -
on 'blueprint' on garage floor. Pipe is 1/2" ID PVC
irrigation pipe from Home Depot. Design by David Okada.

Full-sized roof (84"x 132" x 12") completed on positioning wood
stringers on blueprint. (Short roof cross-pieces and 18" radius corner
tubes were heat bent; long tubes were not. This roof design will use
only five support columns. Design by David Okada.
Connector reaming detail:
A. Top inset shows two drill attachments used. (1) is hole cutter (2) is sanding drum attachment
B. Lower  layout shows typical long axial tube with 'loose' reamed T and 'loose' reamed X connector slid on tube. Cross tubes for T and X connector positioned to indicate where they are inserted and glued into the unmodified joint openings.
Column support detail (Design by David Okada):
A. 8" diam.cardboard Sonotube with two wood interlocking
X-sections inserted at both ends and screwed: Bottom X  

made of 4x6 wood; upper X made from 2x4 wood and capped
with plywood disc. Both X-sections locked in position with wood
screws and finishing washers.
B. Bottom of tube assembly locked to 1" plywood floor from
underneath with countersunk 5/16"x5" lag bolts.
C. Plastic connector with 4 tubes is fastened to disc and the
upper 2x4 wood X section with four conduit clamps.
D. Shown extended wood channels for the 1/4" art panels to be
replaced by stock Home Depot mirror mounting steel channels.
Challenges in creating this installation:
  1. It needs to be suggestive of a conceptual model (I don't want to imply that this design is the solution to the Seeking Shelter Design Challenge.) It is just an invitation to think about interactive/multipurpose bus shelters. The design of the shelter will invite people to add to it. It is a base structure to build upon.
  2. It needs to be sturdy and stable! Many people will be leaning against it, putting decals on it and adding components to it. There will be a wii interactive surface set up on one of the walls in the evening. There will be some seating as well. I want this structure to last past the few festival days so that it can be used in other public contexts.
  3. I need to transport and store this! I have only half a garage and no storage in our house. We are designing this thing to break down into smaller units and assemble on site. Still trying to figure out the transport...