Showing posts with label public participatory art. Show all posts

Tuesday, April 22, 2014

3D printing mobile maker cart prep work almost completed

T-shirt design by Cole for workshop
This coming Sunday my children and I will be engaging the public in 3D printing via a mobile maker cart in San Jose's Japantown. I am working on a website for the project as I will be engaging students in this activity in the coming school year. Here is the project site in the works. Here are the netsuke designs we have created in Tinkercad and hopefully more will be added to this collection on Sunday if visitors wish to explore making their own designs in Tinkercad.

Sample glow in the dark netsuke
It was very interesting to read information about netsuke on the Metropolitan Museum of Art website: http://www.metmuseum.org/toah/hd/nets/hd_nets.htm. I learned that because there was a great deal of regulation of Japanese clothing according to rank and station, the netsuke was a way for the rising merchant class to display their wealth. Since these small purse counterweights could be easily hidden, netsuke could be a whimsical outlet for themes and motifs that ran counter to the officially sanctioned cultural norms of the Edo period.

Thursday, April 17, 2014

Netsuke 3D printing with a mobile maker cart

On April 27th we will be bringing a 3D printing mobile maker cart to Japantown in San Jose and setting up next to Roy's Station on 5th and Jackson. We will be 3D printing small objects, Japanese netsuke, for the public (free). A laptop will also be set up for visitors who wish to explore designing their own netsuke in Tinkercad. Here is a past blog posting on this project.
Cherry blossom design created in Tinkercad.
Mouse netsuke created and shared in Tinkercad.
Sketch for the pop up event's T-shirt design. by Cole (14 yrs old)
With the help of Melinda Po, I conducted a trial run of printing from the cupcake maker cart on site in Japantown, San Jose.
Glow in the dark cherry blossom printed from maker cart.

Monday, May 21, 2012

Seeking Shelter Installation Roof Design

Top view of roof
Underside view of roof
My dad, toy designer David Okada, has been busy working on creating the roof framework for the Seeking Shelter installation that will be a part of the 2012 ZERO1 Biennial. He heat bent pvc tubes to create the arch drawn in our sketches. The wooden discs will anchor the roof to the pillar supports. The thin wooden strips are channels for the polygal walls to slip into.

As a former VP of Boys Toys at Mattel and as a former Director of Inventor Relations at Mattel Toys, my dad has a deep knowledge of materials and construction techniques for both prototyping and for final design constructions. I am very lucky to have him working on this project!

We will be painting both the wood and pvc tubes. I will be sourcing the sonotube support pillars and polygal wall materials in the next few days. In the coming weeks we will be considering how we will possibly integrate Makedo elements into the pieces so that festival attendees can add their building ideas to this bus shelter. I also will have a wii interactive surface setup on one of the bus shelter walls so that people can create dynamic mural patterns on the walls using Repper and photos youth have taken of Silicon Valley.

At tables nearby, we will have model building workshops where people can create prototypes of multipurpose bus shelters, photograph them in a diorama and then upload the images to a flickr site to share as inspiration images for the Seeking Shelter Design Challenge.

Sunday, May 20, 2012

Wrap It Up! Youth video interviews with mural artists

Mural design using archeological artifacts (cow bones for soups and porcelain bowl fragments). Artifacts are from dig site from within the fence area.
QR codes on mural wrap will link to videos hosted on Next Vista for Learning.
A youth video project will launch in the fall that will engage San Jose Japantown youth in interviewing 30 or so local mural artists. The collaborative mural will be a digital fence wrap on the fence bounding Jackson, 6th, Taylor and 7th Street. On the project site, http://wrapitupmurals.weebly.com/ , I am slowly building out the project and lesson plans.

Friday, May 18, 2012

Maker Faire Educator MeetUp

Yesterday I attended the Maker Faire Educator MeetUp at the San Mateo Fairgrounds. I was only able to attend one hour as I had two school open houses to attend, but, wow, what a great preview! It was very inspiring.

Marc de Vinck, Director of Product Development for Makezine, invites educators to experiment with LED lights and batteries.
The first station I came upon was this visually inviting one with colorful LED lights and batteries. This is a great hands on lead-in exploration to introduce youth to electrical circuitry. It is also inexpensive. Marc de Vinck told me that best way to source the LED lights is by searching for bulk LED lights is on eBay (about 1.80 for pack of 15 lights). The lithium batteries are from IKEA and a pack of 8 is $2.00. A roll of duct tape from Home Depot is around $4.00. So for about $17.00 (including shipping costs) you can conduct this really memorable and fun exercise in a classroom of 33. There are cool collaborative public art projects using these components. I saw this video quite a few years ago, but it is stuck in my head: http://www.graffitiresearchlab.com/blg/projects/led-throwies/
I would love to do a project that integrates these LED throwies (the most expensive components are the rare-earth magnets...the cheapest that would work are around .15 cents each)

The other booth/station I spent a lot of time at was hosted by BrainSpaces in partnership with the Chicago Architecture Foundation. Their Maker Faire project invites youth to envision a better school locker. Their project site is elegant and so very well structured to walk one through the design process. It was incredibly inspiring to chat with Kelly Tanner of Brain Spaces and I wish I had know about this project earlier. It overlaps a lot with what I am doing in the Slot Shelters project and the Seeking Shelter Design Challenge.

You can see in the image below how engrossed educators were in exploring Google SketchUp to create their lockers.


As I walked to my car I took a picture of a public art project that will be installed during the Maker Faire. To me this dandelion sculpture (I think it lights up at night) really symbolizes the Educator MeetUp; teachers will return to their classrooms with seeds of inspiration for projects to engage their students with in the coming academic year. We have the summer to stew upon ideas. Can't wait to see what grows from these seeds of thoughts planted.


Tuesday, May 15, 2012

Interactive Bus Shelter Installation

I have been fortunate to have my dad, a toy designer and great creative mind, working on the Seeking Shelter art installation for the 2012 ZERO1 Biennial. Working from my conceptual sketch, he has designed a great roof framework made from PVC tubes and connectors. The walls of the shelter will be polygal upon which the public will add removable window decals designed by local youth.The pillars of the shelter will be cardboard concrete pour tubes. I am also hoping to integrate the use of Makedo  connectors and cardboard into the installation and related table activities at the ZERO1 Biennial event days in September. I am still dreaming of having a few of Monkey Wrench Design's tin can phones in this installation. (see the cans sitting on the yellow disk tables in sketch below). 12 more days to fund their project on Kickstarter!
My original bus station concept and rendering. The
zig-zag vertical walls are four 4' x8' x 1/4" corrugated plastic
translucent panels, polygal.
First scale model by David Okada. 1" = 1,' made of 5/8" wood dowels
and wire.Dowels are nailed and glued to the 'blueprint.'
Zig-zag panels are thick clear acetate sheet.
Initial laying out of full-sized PVC pipe roof -
on 'blueprint' on garage floor. Pipe is 1/2" ID PVC
irrigation pipe from Home Depot. Design by David Okada.

Full-sized roof (84"x 132" x 12") completed on positioning wood
stringers on blueprint. (Short roof cross-pieces and 18" radius corner
tubes were heat bent; long tubes were not. This roof design will use
only five support columns. Design by David Okada.
Connector reaming detail:
A. Top inset shows two drill attachments used. (1) is hole cutter (2) is sanding drum attachment
B. Lower  layout shows typical long axial tube with 'loose' reamed T and 'loose' reamed X connector slid on tube. Cross tubes for T and X connector positioned to indicate where they are inserted and glued into the unmodified joint openings.
Column support detail (Design by David Okada):
A. 8" diam.cardboard Sonotube with two wood interlocking
X-sections inserted at both ends and screwed: Bottom X  

made of 4x6 wood; upper X made from 2x4 wood and capped
with plywood disc. Both X-sections locked in position with wood
screws and finishing washers.
B. Bottom of tube assembly locked to 1" plywood floor from
underneath with countersunk 5/16"x5" lag bolts.
C. Plastic connector with 4 tubes is fastened to disc and the
upper 2x4 wood X section with four conduit clamps.
D. Shown extended wood channels for the 1/4" art panels to be
replaced by stock Home Depot mirror mounting steel channels.
Challenges in creating this installation:
  1. It needs to be suggestive of a conceptual model (I don't want to imply that this design is the solution to the Seeking Shelter Design Challenge.) It is just an invitation to think about interactive/multipurpose bus shelters. The design of the shelter will invite people to add to it. It is a base structure to build upon.
  2. It needs to be sturdy and stable! Many people will be leaning against it, putting decals on it and adding components to it. There will be a wii interactive surface set up on one of the walls in the evening. There will be some seating as well. I want this structure to last past the few festival days so that it can be used in other public contexts.
  3. I need to transport and store this! I have only half a garage and no storage in our house. We are designing this thing to break down into smaller units and assemble on site. Still trying to figure out the transport...


Saturday, April 28, 2012

Steinbeck Festival Workshop: Visual Rhythms

Above: Pattern tile created in Repper from photo of below.
Abive: Hair salon mural in the Alisal neighborhood of Salinas, California.
On May 5th from 2-5pm I will be conducting a youth workshop for the Steinbeck Festival at the Alisal Center for Fine Arts. The Visual Rhythms: Community Pattern Workshop will engage children in creating patterns that representing their community. Using both traditional and digital media, youth will explore imagery that symbolizes their neighborhood. They will also write statement explaining the inspiration for their designs. Using the freeware digital tool, Repper, students will create digital patterns from photos of their community.
Students create radial patterns reflecting on community using tracing paper, color pencils, and markers.
Orange chair at Salinas Adult School, Alisal, Salinas, California.
Radial pattern repeat created in Repper from photo above.
Students will be using a flickr set of images of Alisal Salinas to create their digital patterns. Each participant will be able to print a window decal of their design to take home.
repeat pattern and pattern tile created in Repper printed on decal film.
Decal placed on window.

Participants will also be able to explore radial pattern design in an exercise using tracing paper. Sample images here.

A wii remote interactive surface set up will enable children to take turns creating a large scale projected mural pattern on one of the art center wall.

The project is made possible by a donation loan of 10 computer tablets by the Krause Center for Innovation at Foothill College.

As an extension of this project, student images will be uploaded for use in the Slot Shelters Project sponsored by the ZERO1 Biennial . Patterns created in this workshop will be used by other students as surfaces on their Google SketchUp building explorations.

Monday, May 25, 2009

AAWAA 20th Year Celebration..Planning and Conceptualizing

I am a member of an artist group called AAWAA.
It is an Asian American Women Artists group here in the San Francisco Bay Area founded twenty years ago by Flo Oy Wong and Betty Kano and includes musicians, writers and visual artists.

We are in the planning stages of what we will do for this 20 year celebration and have rented SOMA ARTS for an evening celebration on September 26th and a two week period surrounding that date.

Only in the past year has AAWAA become an official 501c nonprofit and notably last year AAWAA had an artist residency at the de Young Museum in San Francisco titled “A Place of Her Own”. This exhibit was conceptualized by Cynthia Tom.

AAWAA also published a book called “Cheers to Muses” and members have participated in presenting lectures at nearby universities and colleges.

In celebrating this 20 milestone, we need to look both backward and forward and build upon what the organization has already done. Two of the exhibits at the 20 year anniversary will focus upon expanding on Cheers to Muses and A Place of Her Own concepts. There will also be a display of the history of the organization and works of current and past members. Sue Kwon of Channel 5 News has graciously agreed to join us for the evening in some sort of presenter function.

I am participating in brainstorming and conceptualizing how to expand the Place of Her Own concept out to become a public participatory project. I would love for the actual “box” that the individual personalizes to be something that is downloadable... a template that can be printed and folded up into a box. I would also like to see the AAWAA website post images of these individual creations ...people would photograph their box and email the image back creating a sort of online virtual tapestry of little spaces knit together. For the purposes of the 20th anniversary perhaps we would have an earlier workshop using pre assembled boxes to work with and then at the event have a table were people could create their spaces and add them to the growing tapestry.


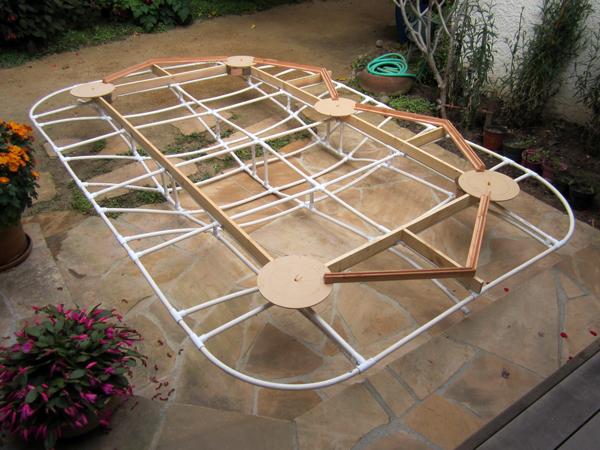
Above: Rough concept sketch of fold up boxes that individuals would personalize. These shapes would then be connected to form a hanging installation to be hung in SOMA ARTS. The outside of the box would be decorated with images representing how we present ourselves to others and the inside would be decorated with images and objects that represent one's interior creative self and space.

CONCEPT FOR VISITOR PARTICIPATORY PROJECT
Having space or place of one's own as an artist does not mean just a physical space. As an artist it is most important to create a space for quite creativity in one’s mind. We all need people in our lives who help us create that mental space. It seems cliché, but it does take a village, whether it is someone willing to listen, babysit, critique a painting or read our writings … we need the nurturing of others to help us define ourselves as artists and create that mental space to be one. So often we do not get that support. It is also important that we freely offer that support to others as well.

As a female artist and caretaker with other responsibilities, I know I speak for a lot of women artists when I say that my art world is cobbled together from different contacts and experiences and these all thread together at disjointed times…an email here and an email there. We do not live and breathe being an artist all day; it is a fractured existence of disjointed moments between other roles. My blog is my space of my own where I have my voice and can articulate ideas in an organize way. My time in my studio at night is my space of my own to create my art.

My physical art space used to be a large sheet of cardboard from a refrigerator box that I would lay flat across my bed for a work space. At night I would tie down my art with wire and prop it against the wall so my husband and I could sleep in the bed. It didn’t bother me that this was an unusual set up. I was compelled to create my work and this was my solution to create a large work area. The key was that I had the mental space to view myself as an artist and not as a crazy woman with cardboard on her bed.

I have an artist friend, Nemo Gould, who, when I met him, had created a huge mechanical squid the length of a car. I thought, man, this guy must have the hugest coolest studio. Nope, he built it in the narrow hallway of his apartment! He had understanding roommates. It takes imagination not only to create art, but to create that mental space to envision you available physical space as usable and to make it your studio. (By the way this was years ago and I think Nemo now has that huge cool studio).

We need the support of others to create our own space. It may seem ironic, but we need others to help us find that private isolated mental space to explore who we are as artists.

Reflecting this interlocked nature, I envision that the AAWAA visitor participatory tapestry would be composed of interlocking containers folded up from a PDF template printed on cardstock. The PDF could possibly have information printed on it somewhere about mental breathing space. It could have mental health info on it as well. This mental health issue was brought up in some of the discussions and perhaps can be intergrated. Cynthia Tom also envisioned an outreach component to social services and women's shelter to develop an art workshop that is designed to help women express themselves and think about what they need to create that place of her own. I envision that the completed tapestry would have some empty spaces or blackened boxes representing space yet to be discovered.

At any rate this above is a first pass at the concept.
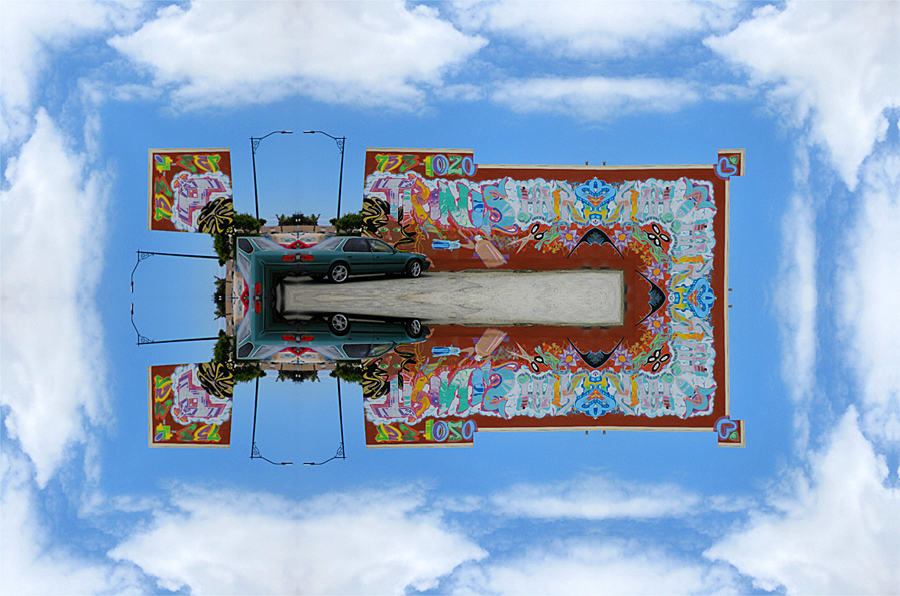


Shizue Seigel sent this image to me of a piece she had created in another workshop.
"On a related theme, at a workshop we were given a box with a lid and asked to decorate the outside as others expected us to be, the inside as our inner selves. They were commercially produced carboard boxes. Instead of lid and box, each of the two pieces could be separate units with the outside on one side, walk round to see the inside, strung with fishing line." I can visualize elements of this used for the Place of Her Own visitor participatory project.