Here are the rough drafts of animations from the second session of animation camp. The children were really creative and I loved the different stories each came up with. The children imported each of their still images into Premiere Elements. The audio they recorded on the last day of the workshop. I cleaned up these sound files with the freeware Audacity. This animation, The Funny Crazy Animation, is almost completed. Audio is inserted. I will do a little Photoshop retouch to eliminate some of the string and wire supports. The end credit text will also be added.
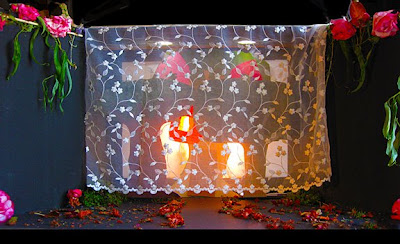
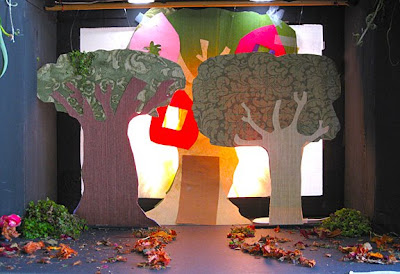
The tales in the animation Discoveries in the Garden all have garden or park scenes. The figures in this group worked quite well with the magnet feet and cookie tray. I will be doing a little bit of Photoshop retouching of wires and such in this animation as well.
We will be having a screening of the children's work next Monday. We are also fortunate to have Raquel Coelho present a few of her animations, her puppets and children's books during this gathering. She is a professor in the Animaiton Department at San Jose State and has worked at DreamWorks and other Bay Area animation studios. I am really excited to see her work in person and know the children will be inspired by her work, too. She has been very gracious in agreeing to speak to us. We were also very lucky to have a tour at De Anza College's Animation Department with this group as well last Thursday.
Tuesday, July 28, 2009
Tuesday, July 21, 2009
Animation Camp Week 2, Day 1
Yesterday was the first day of my second session of children's stop motion animation camp. I am really learning along side the children and it is so inspiring to see their creativity in process. I especially enjoy hearing them encourage each other. This session I have the assistance of my niece and an older student entering Junior High who has been in two of my workshops. It is wonderful to have their help.
I have found that egg cartons work great for storing and staging small clay parts. For simple animation sequences this is a good way to introduce children to stop motion. The children started off creating a sequence in which clay cubes transform into two different objects and back to a
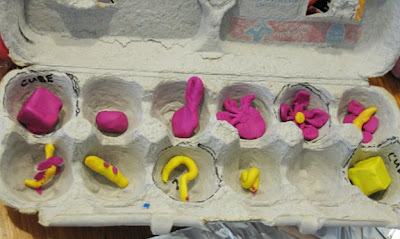
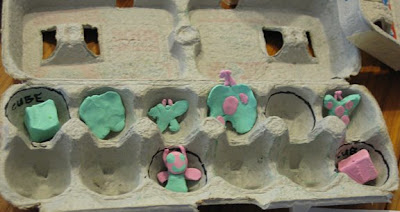

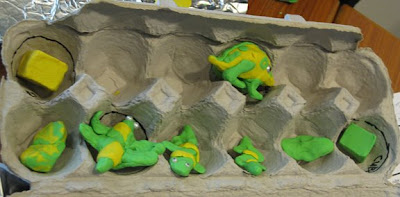
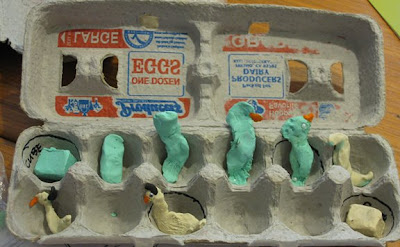
 cube.
cube.
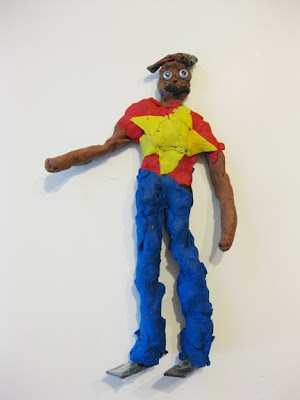
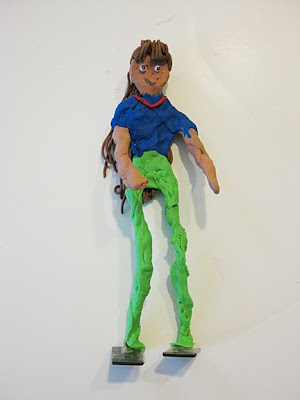
In the first class they created the transforming cube parts and larger people. The people were built up on twisted floral wire stick figures. Their feet are taped down to magnets. We did this to experiment with them standing on cookie sheets. I am hoping that the magnets on their feet will be able to support them on metal cookie sheets, but the magnets I used may not be strong enough once all the clay is added, in which case, we will also have wire supports behind the figure that we will try to hide.
I love the personalities of each of these figures. The children had a blast using a pasta maker to create sheets of clay for clothing. We also had a clay extruder to make strands of hair.


Storyboarding was also introduced in this first day. In fact, they did not touch any clay until they had a storyboard for their transforming cubes. We looked at sample storyboards from past students and we looked at samples online. After the children completed their storyboard and cube parts, they sketched their clay people. They were told that these figures were to interact with their magical transforming cubes. After the people were completed the children created detailed storyboards for that interaction.
Day 1:
Introduction to storyboarding
Create transforming cubes (place parts in egg cartons)
Sketch characters to interact with the cubes
Create clay figures over wire armatures (in our case thread covered floral wire and magnet feet)
Create detailed storyboard for interaction of figure with transforming cube
I have found that egg cartons work great for storing and staging small clay parts. For simple animation sequences this is a good way to introduce children to stop motion. The children started off creating a sequence in which clay cubes transform into two different objects and back to a


 cube.
cube.In the first class they created the transforming cube parts and larger people. The people were built up on twisted floral wire stick figures. Their feet are taped down to magnets. We did this to experiment with them standing on cookie sheets. I am hoping that the magnets on their feet will be able to support them on metal cookie sheets, but the magnets I used may not be strong enough once all the clay is added, in which case, we will also have wire supports behind the figure that we will try to hide.
I love the personalities of each of these figures. The children had a blast using a pasta maker to create sheets of clay for clothing. We also had a clay extruder to make strands of hair.


Storyboarding was also introduced in this first day. In fact, they did not touch any clay until they had a storyboard for their transforming cubes. We looked at sample storyboards from past students and we looked at samples online. After the children completed their storyboard and cube parts, they sketched their clay people. They were told that these figures were to interact with their magical transforming cubes. After the people were completed the children created detailed storyboards for that interaction.
Day 1:
Introduction to storyboarding
Create transforming cubes (place parts in egg cartons)
Sketch characters to interact with the cubes
Create clay figures over wire armatures (in our case thread covered floral wire and magnet feet)
Create detailed storyboard for interaction of figure with transforming cube
Saturday, July 18, 2009
San Jose Museum of Quilts and Textiles Installation
A few months ago I participated in the San Jose SubZero Festival by creating a visitor participatory semi-permanent art installation (yes, a mouthful!). The three banners are now up on the exterior facade windows. These were created quickly in a month and a half and originally I designed them to be banners hung higher up, that is why they do not fit perfectly in the windows.
There are a lot of things I would do differently now, but it was a good learning experience. I would love to expand and refine the concept of this project next year for Earth Day. I think it would be stunning to have all the windows covered in strands of only the woven diatoms and plastic bottle bottoms with some solar led lights illumination. I have started to conduct Earth Day assemblies in schools and envision an extension project in which students create the diatoms to be strung and hung in the museum windows. I'll be brewing on this idea.
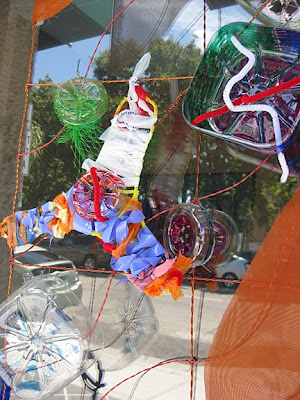
Two of the banners got tagged. I kind of like it. Bu the things that stands out to me most is that the banners do not fit neatly into the windows and there are not enough participatory diatoms attached. Many people walked away with their creations and did not add them to the banners.


Below: Details of the elements the visitors created. I love the colors and textures. Each of these represent a diatom, a unicellular organism found in water. The plastics are all recycled and collected from creek clean ups and from three different schools in Cupertino and San Jose.


There are a lot of things I would do differently now, but it was a good learning experience. I would love to expand and refine the concept of this project next year for Earth Day. I think it would be stunning to have all the windows covered in strands of only the woven diatoms and plastic bottle bottoms with some solar led lights illumination. I have started to conduct Earth Day assemblies in schools and envision an extension project in which students create the diatoms to be strung and hung in the museum windows. I'll be brewing on this idea.
Two of the banners got tagged. I kind of like it. Bu the things that stands out to me most is that the banners do not fit neatly into the windows and there are not enough participatory diatoms attached. Many people walked away with their creations and did not add them to the banners.


Below: Details of the elements the visitors created. I love the colors and textures. Each of these represent a diatom, a unicellular organism found in water. The plastics are all recycled and collected from creek clean ups and from three different schools in Cupertino and San Jose.


Friday, July 17, 2009
Lords of The Samurai
The San Francisco Asian Art Museum hired me to create eight craft lesson plans that tie into their current Lord of The Samurai exhibit. Each project is designed to be simple and use a downloadable template and instructions. These projects are introduced on the Lord of the Samurai blog and then from there link to there website where you can download the template files and instructions.
Below are images of the projects created so far.
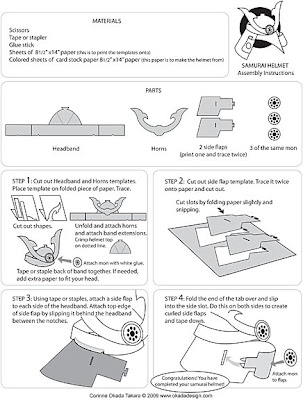
Samurai Helmet (Kabuto):

Here is a sample instruction sheet. This series of projects has really gotten me to work with the software program Illustrator again. This particular helmet project was difficult to design in a simple manner. Earlier versions were much more detailed and complicated and even this simplified version's instructions were a challenge to fit on one page. The are three separate pages of templates for this project as well.
Samurai Half Mask (Mempo Mask) complete with sweat drain tubes (made of straws) and whiskers made of recycled produce netting:

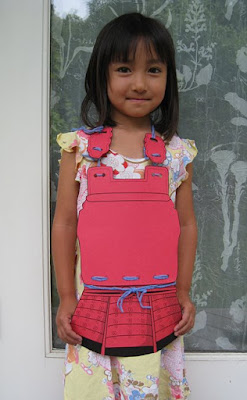
Samurai Tosei Gusoku-Type Armor:
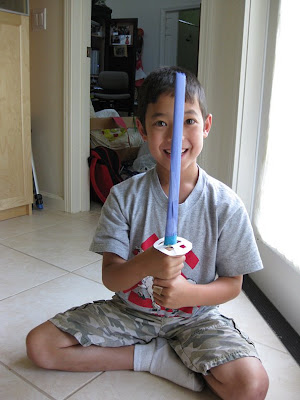
Samurai Sword:

Hands down, this was my son's favorite project. You can see from his face how thrilled he is to have created one. He helped me design it, too. This is his prototype.
Next I will be creating the lesson plan for a haiku project. I have conducted haiku projects several times with elementary school children and it is very entertaining and engaging. All these templates will be posted on The San Francisco Asian Art Museum's website (scroll to the bottom of the webpage to see them). The museum will be uploading a new project every week.
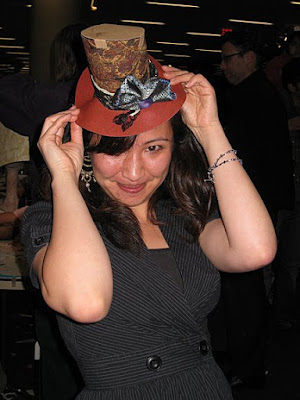
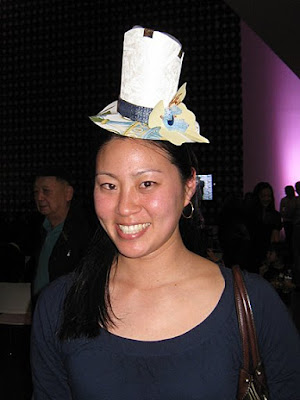
In a few years I hope to put together a book of all the various museum craft projects I have created. I have quite a collection now. I think that some can be quite fun for adults, too; I have been asked if I do bridal showers and corporate events when I conduct my paper hat workshops. Recycled materials are often designed into my projects adding an important if subtle conservation message. Below is one such project (for the de Young Museum) that used recycled sample wallpaper books, discarded tie fabric and produce netting to create fun and stylish hats.


Below are images of the projects created so far.
Samurai Helmet (Kabuto):

Here is a sample instruction sheet. This series of projects has really gotten me to work with the software program Illustrator again. This particular helmet project was difficult to design in a simple manner. Earlier versions were much more detailed and complicated and even this simplified version's instructions were a challenge to fit on one page. The are three separate pages of templates for this project as well.

Samurai Half Mask (Mempo Mask) complete with sweat drain tubes (made of straws) and whiskers made of recycled produce netting:

Samurai Tosei Gusoku-Type Armor:

Samurai Sword:

Hands down, this was my son's favorite project. You can see from his face how thrilled he is to have created one. He helped me design it, too. This is his prototype.

Next I will be creating the lesson plan for a haiku project. I have conducted haiku projects several times with elementary school children and it is very entertaining and engaging. All these templates will be posted on The San Francisco Asian Art Museum's website (scroll to the bottom of the webpage to see them). The museum will be uploading a new project every week.
In a few years I hope to put together a book of all the various museum craft projects I have created. I have quite a collection now. I think that some can be quite fun for adults, too; I have been asked if I do bridal showers and corporate events when I conduct my paper hat workshops. Recycled materials are often designed into my projects adding an important if subtle conservation message. Below is one such project (for the de Young Museum) that used recycled sample wallpaper books, discarded tie fabric and produce netting to create fun and stylish hats.


Wednesday, July 15, 2009
Present Tense Biennial
I received an email regarding a panel discussion about contemporary art, community and public space and was intrigued by the project being discussed. It is called Present Tense Biennial and is presented by the Chinese Culture Center of San Francisco in collaboration with Kearny Street Workshop. The panel discussion is July 25th form 1-3 in the San Francisco Culture Center Auditorium. This biennial exhibition showcases vibrant and diverse perspectives on contemporary Chinese culture. Featuring artists from the Bay Area and beyond, the show includes a wide array of media at the Center’s main gallery and in storefronts throughout Chinatown.
Here is the show's website:
http://presenttense.us/
Many very interesting artists are participating. Here are a few:
Cui Fei:
http://www.cuifei.net/works/letter5.htm
Bu Hua:
http://www.china.org.cn/english/2004/Nov/113605.htm
I think this would be a great model for showcasing artwork in Japantown, San Jose. Inviting contemporary Chinese and Japanese American artists to create art for storefronts and reflect on the history of San Jose's Heinlenville Chinatown/Nihomachi would result in innovative and engaging art that would educate the public on the histroy of the site and bring visitors to this area.
Friday, July 10, 2009
Last day of Animation workshop 1
Today was the last day of the animation workshop. It was an intense week of working and I think all of us were quite tired by today. I know that the children all have a renewed appreciation for the animations they see in movies and TV. It is a lot of concentration and hard work for so few seconds! Yesterday they had a very interesting tour of De Anza's Colleges Animation Department. It was good for them to know that a really excellent animation program is right here in Cupertino. Today the students recorded sound using the freeware Audacity and they imported the image files. They will add music later.
Below is the rough draft that the three boys created. Their story is about a few pet shop animals that try to escape a pet shop but then are caught again. Each animal tries to escape the shop on his own and is caught. When they are put in the same cage they use teamwork to escape and sail home in paper boats they find. The final animation will be two minutes and a music track will be added as well. All the still images and audio files were inserted into Premier Elements by the children. There is very little dialog here. They had fun creating the sound effects using paper, water in a tupperware, my creaky door and rattling keys.
Teamwork Animation:
The three girls' animation was focused on vanity and the bad consequence of it. A group of fairies are invited to a party. Two of the fairies wear big puffy showy dresses and fail to realize that it is a bowling party even though the older wiser fairy advises them not to be so dressy. The two fairies brag about how beautiful they are. At the bowling alley, one overdressed fairy knocks down a little girl's drink with her big fancy skirt. The overdressed fairies bowl terribly. They end up learning their lesson and have a yard sale to sell the big puffy dresses. The girls created a lot of dialog and even wrote out their script. There will be music added to this animation. All the still images and audio files were inserted into Premier Elements by the children.
Vanity Animation:
Wednesday, July 8, 2009
Day Three of Claymation, Pet Shop and Fairy Party
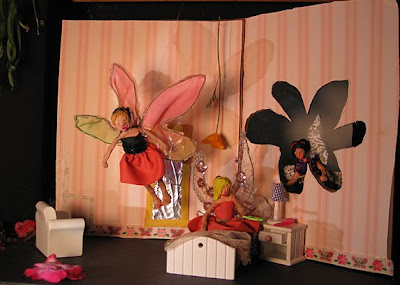
Today the children started filming their animations. We had two stages and two cameras working. Here the girls are filming their fairies. We filmed in my garage. Thankfully it was not super hot today! It did get hot with all the lights, though. The children rotated through roles of director, animator and camera person.
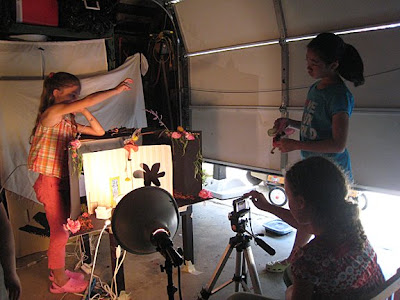
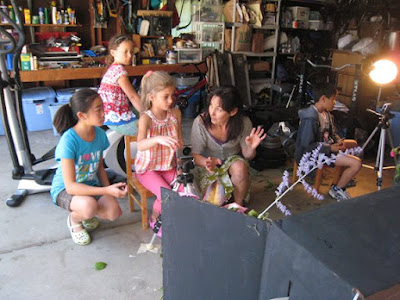
The girls picked flowers from my garden to decorate the set. I love the elegant feel. Each of the girls spent a lot of time carefully creating their sets and costumes. They created wings of floral wire (24 gauge). They cut lace and fabric and then hot melted the material to the wings. The wings were tied on with fishing thread. We use this fishing thread to make the fairies fly, too.

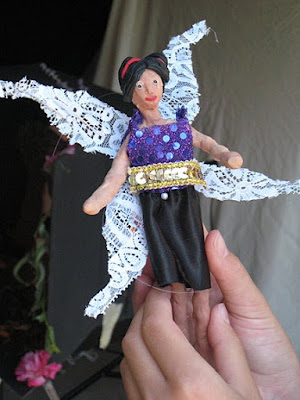
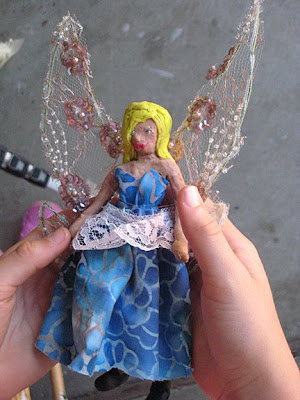
This fairy was created by Brittany, the oldest girl in the group. I really like how she styled the hair and the outfit she created. All the girl's garments are quite sophisticated in color and style. The next fairy down is Nina's and the bottom one is Kadin's.

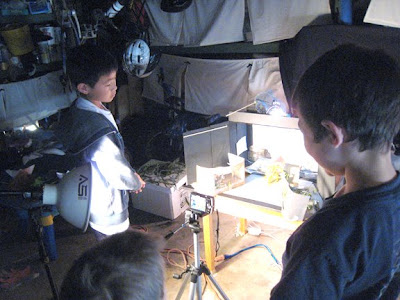
Here the boys are filming scenes from their pet store animation.
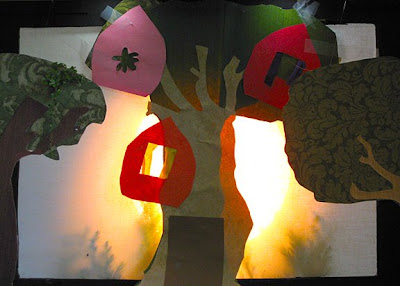
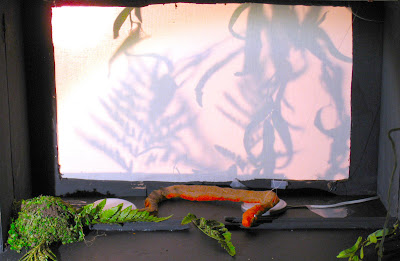
They used the shadow set back lighting a lot. It was interesting listening to the boys verses the girls. The boys were quite silent in their interaction as they snapped their shots. The girls were much more verbal in discussing their shots and each move. It was an entertaining contrast!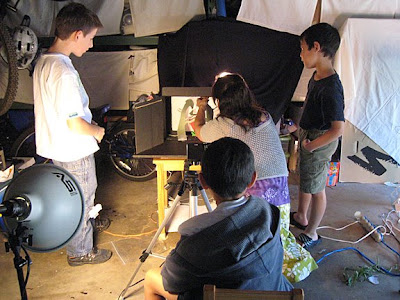

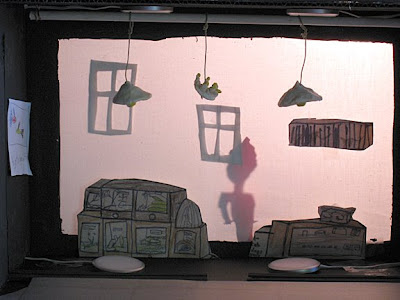

Below: Perhaps my favorite frame of the whole animation. Mitchell took this bug eye view of being caught in the net.


The girls picked flowers from my garden to decorate the set. I love the elegant feel. Each of the girls spent a lot of time carefully creating their sets and costumes. They created wings of floral wire (24 gauge). They cut lace and fabric and then hot melted the material to the wings. The wings were tied on with fishing thread. We use this fishing thread to make the fairies fly, too.


This fairy was created by Brittany, the oldest girl in the group. I really like how she styled the hair and the outfit she created. All the girl's garments are quite sophisticated in color and style. The next fairy down is Nina's and the bottom one is Kadin's.


Here the boys are filming scenes from their pet store animation.
They used the shadow set back lighting a lot. It was interesting listening to the boys verses the girls. The boys were quite silent in their interaction as they snapped their shots. The girls were much more verbal in discussing their shots and each move. It was an entertaining contrast!


Below: Perhaps my favorite frame of the whole animation. Mitchell took this bug eye view of being caught in the net.


Subscribe to:
Posts (Atom)

